

How To Fix A Floor In A Camper
Many folks who honey—and preserve—an older RV accept found a painful reality in their treasure: soft spots in their floor. Usually the trouble can exist traced back to a water leak that's compromised the integrity of the floor. You lot can sometimes ignore it for a while, only it tin become downright dangerous. Having a guest autumn through your bathroom floor is non a pleasant idea.
Replacing a bad spot in the flooring is challenging, but non impossible for the do-it-yourselfer. It takes fourth dimension and patience, and at times a fleck of imagination. We'll walk you lot through the process.
Out With the Sometime
 We recently undertook to solve a soft floor problem in our elderly travel trailer. A previous possessor had let a toilet leak get to the signal that an area of the plywood floor in the middle of the bathroom finally developed dry rot. When we first adopted the trailer we did our best to ignore it, just after a few months, it became apparent that ignorance wasn't elation. Something had to be done.
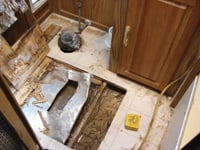
The beginning step in dealing with nasty flooring rot is to pray intensely that the underlying floor material is plywood. Particle board flooring is a curse, and will quickly turn to powdery fluff. Much can be learned by dismounting a floor estrus register near the criminal offence scene and taking a squint at the floor fabric underneath. We found 3/4-inch plywood under our vinyl floor, which meant nosotros'd only demand to cut into "solid wood" a few inches beyond the impairment. If you've got particle board rot, y'all'll be cut a long way back.
By judicious tapping and pressing, nosotros managed to figure out how large an expanse of soft wood nosotros were dealing with, and then went a few inches farther abroad from the soft spot and determined that this would be the floor surface area that we would cut out. Using a foursquare and a felt-tip marker, we carefully drew out a rectangle on the flooring as the target lines for our cut. Setting a circular saw the thickness of the floor (and no more than), we then cutting along the lines. From in that location information technology was a matter of using a pry bar and hammer to wrench the old plywood out of the hole, as the manufacturer had used plenty of long staples to install the original plywood decking.
If at all possible, information technology's best to exit the sometime plywood intact, as opposed to beating information technology into little pieces. This can give you a template to employ in cutting the replacement forest. However, in our case, the vinyl flooring was only attached to the plywood around the borders, so nosotros were able to apply the cutout flooring as our template piece.
With the plywood out of the hole, you'll probably have plenty of piece of work to do to become the remaining staples out of the floor joists. We found that grabbing the staple close to the joist with diagonal pliers, so twisting the pliers on the joist gave plenty leverage to yank the long-legged staples out of the wood. A shop vac will speedily suck up the grit and plywood fragments, keeping your work surface area make clean and making information technology much easier to work.
Preparing for Replacement Plywood
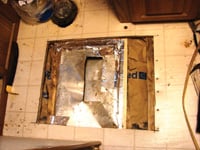
 Yous'll demand to create a new base of support for your replacement plywood. In some cases, you may be able to apply suitably sized dimensional lumber to create new floor joists, but there will be areas where yous tin can't run and attach them to the existing joist organization. Since you can't have the new (and remaining skillful) plywood hanging in midair, you'll use a system of cleats to form that support.
Basically a cleat is a clamper of dimensional lumber (2 x 4s are skilful for this) laid on its side, and tucked underneath the edge of the proficient remaining plywood. Stick the cleat upwards under the existing plywood and so that one-half of the cleat is sticking out from under the plywood, like a tongue. Using 2 1/2-inch drywall screws, we drove screws downwardly through the existing floor into the cleat, spacing the screws close to 3 inches on eye. When yous lay the new plywood replacement piece in the hole, it volition exist supported past the cleat and you only run screws through the new plywood into the cleat. Voila! The new "plug" is firmed into the spot.
In some areas you may be very close to an existing flooring joist—say the cut is right along the edge of a joist. In this example you can make a "sis" by screwing another joist piece onto the existing joist. Here the plywood screws into the sister.
You Aren't Washed Yet
 Alas the width of the circular saw bract will likely go out a kerf that's seemingly equally wide as the Grand Canyon. Depending on what you'll use for replacement floor coverings, those nasty cracks need to be filled upwardly. The floor-leveling compound sold at lumberyards works OK for sticks-and-bricks homes, but it's a plaster-based substance that easily cracks with motion. Bounce your RV down the highway a few times and if your floor-leveling compound breaks up, you'll have information technology ruining your new flooring. We were stumped for a while.
So a contractor friend said, "Bondo it!" Sure enough, automotive body filler was our respond. This had to be the longest function of the job. Mixing the fiberglass-like compound up, smoothing information technology into irregularities and cracks, drying information technology, then sanding it with a belt sander seemed to accept forever. Don't try to fill deep voids or irregularities in one shot; you'll need to come later on them in a multi-layered approach. If y'all're recovering with vinyl, be sure your screws are driven downward deep and covered with trunk filler. And be sure to follow the precautions with regard to safety. Boxed up in an enclosed RV with fumes from this stuff filling your lungs is a surefire way to damage your organism.
If yous're doing a replacement vinyl flooring, you lot'll really demand to pay close attending to getting this flooring prepping done smoothly, as imperfections volition evidence. Laminates or carpeting cover a multitude of sins.
Russ and Tiña De Maris are authors of RV Boondocking Basics—A Guide to Living Without Hookups, which covers a full range of dry camping topics. Visit icanrv.com for more data.

How To Fix A Floor In A Camper,
Source: https://rvlife.com/techtips-repairing-floor-soft-spots/
Posted by: borismoseect1983.blogspot.com
0 Response to "How To Fix A Floor In A Camper"
Post a Comment